

While Google Postmaster V1 is now discontinued, V2 is the new portal for monitoring compliance statuses and represents the way forward. Marketers will need to transition their compliance monitoring to the new Postmaster V2 portal. This guide provides instructions on how to set up your domain in Google Postmaster V2 and interpret the resulting compliance metrics.
Create Account
First, head over to https://postmaster.google.com/v2/u/2.
(You’ll need a Google/Gmail account to create a Google Postmaster Tools account.)
Add Domain
Under “Select a domain,” choose Manage domains.
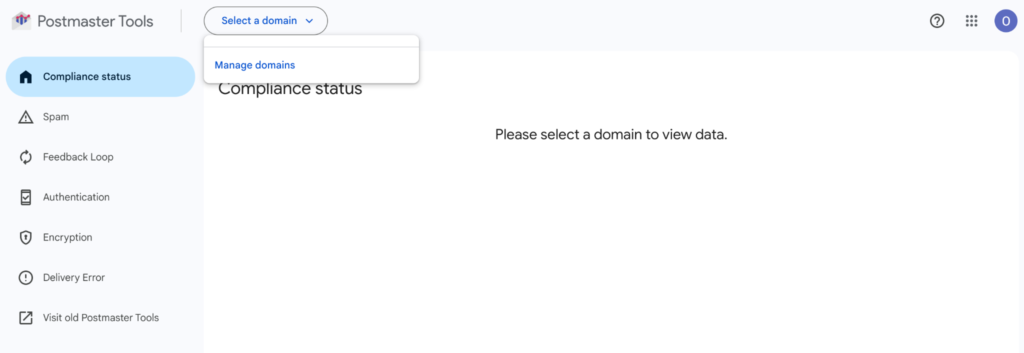
(If you have multiple Google accounts, make sure you’re logged in with the account you want to add the domain to. You can verify this by clicking on your avatar in the upper-righthand corner.)
Add New Domain
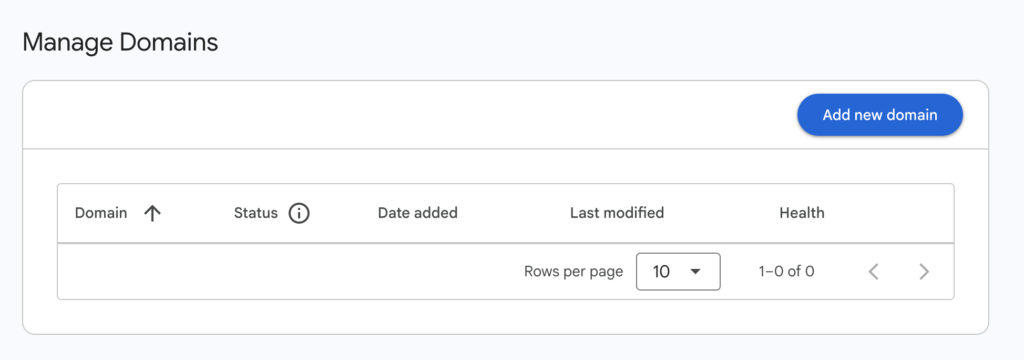
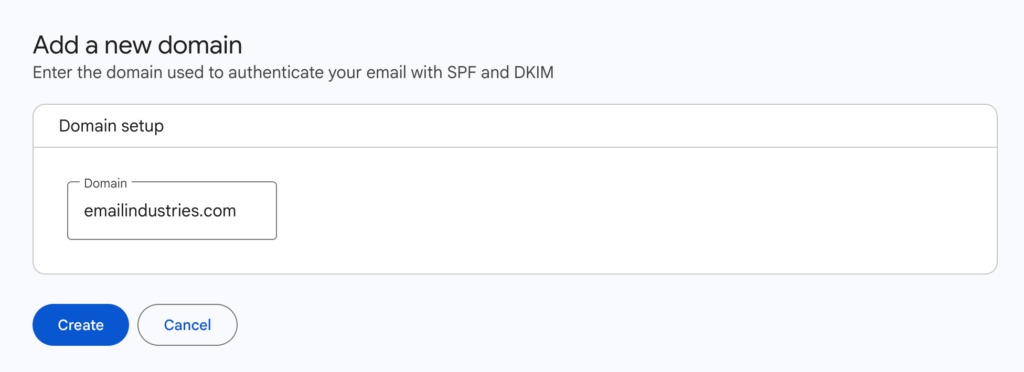
Once the domain is added, go back to the Manage Domains page. Select Verify domain from the options to see the DNS records.
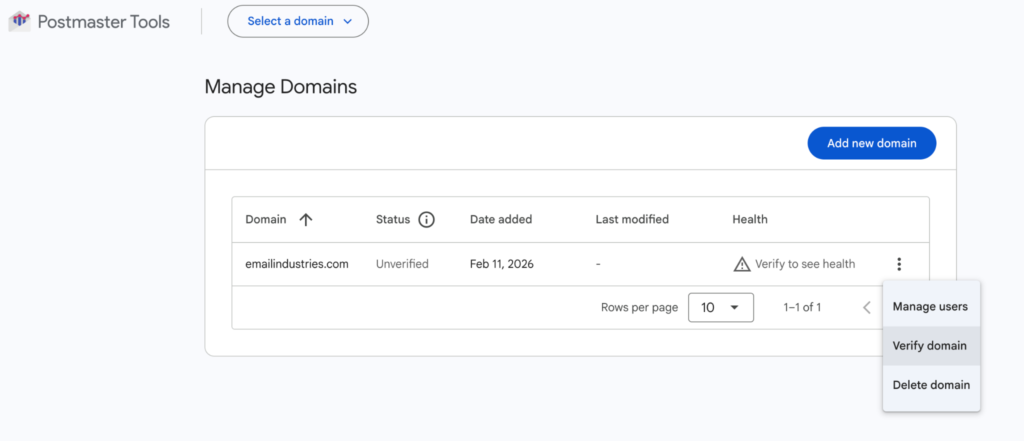
Add TXT to DNS
Google Postmaster will give you TXT and CNAME options to add it to your DNS zone.
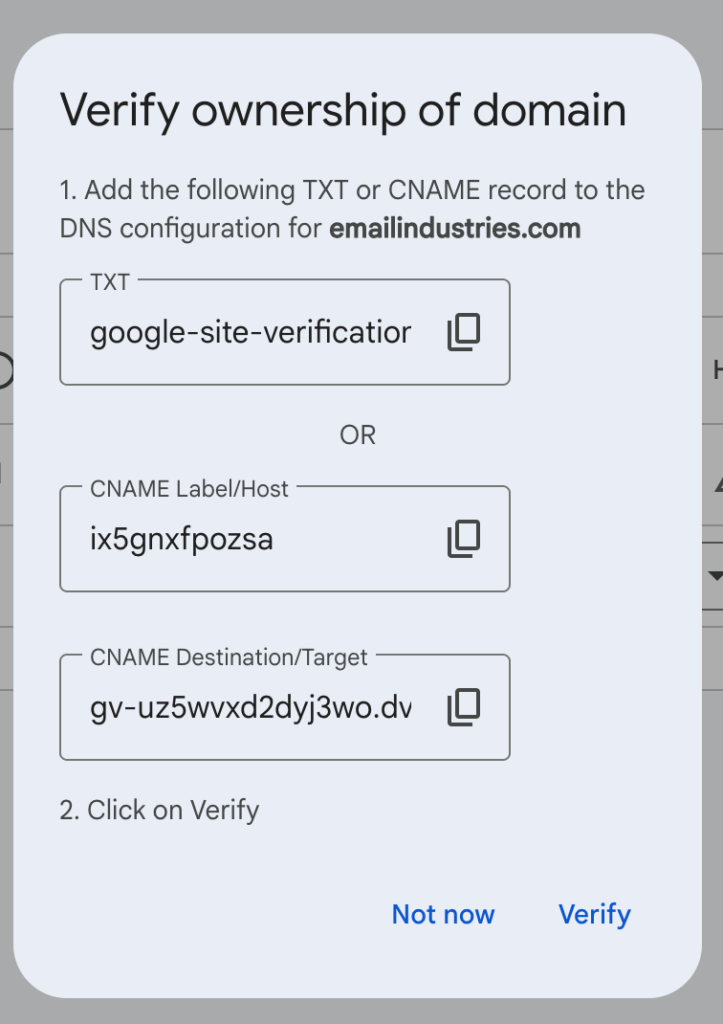
While the process is simpler than it might appear, you have a choice between two verification methods for adding records: using a TXT record or a CNAME record. Below are the instructions for both.
Ask for Help
Provide the following precise text string to your DNS administrator, typically an IT professional: “We need to add this TXT or CNAME record to our DNS to enable deliverability monitoring for Gmail.”
Do it Yourself
Setting up Google Postmaster Tools is straightforward, though the specific steps for adding the required TXT record will vary depending on your DNS provider (like GoDaddy or Cloudflare).
While each provider has its own interface, the general procedure is as follows:
- Access your DNS provider account and select the domain you wish to configure.
- Navigate to the DNS settings, where you will find an option to add a TXT record. (This option may be labeled simply as “add record,” “add,” or you might need to look for something like “edit zone.”)
Steps to Add the Google Postmaster Verification TXT Record (Example: GoDaddy)
- Access Domain Details: Navigate to your domain name settings.
- Manage DNS: Locate and select the “Manage DNS” option.
- Add New Record: Click the button to add a new DNS record (often labeled “Add” or similar).
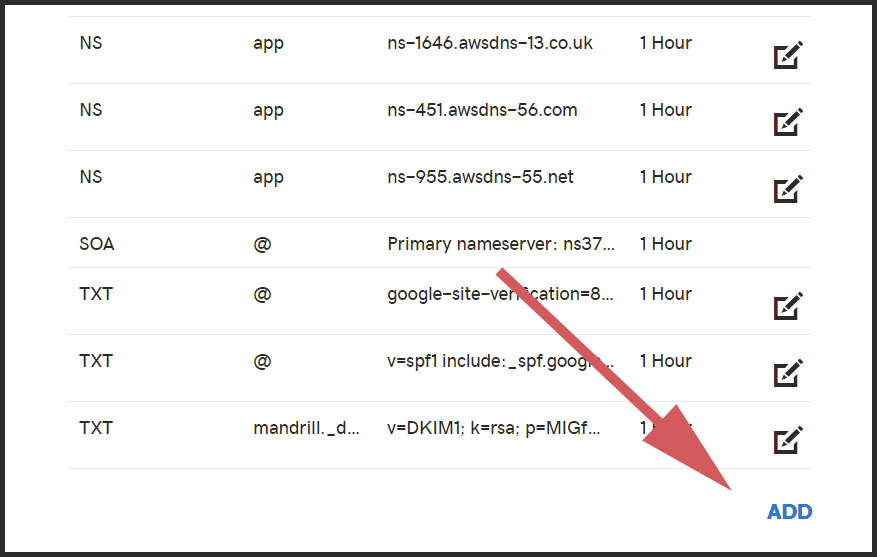
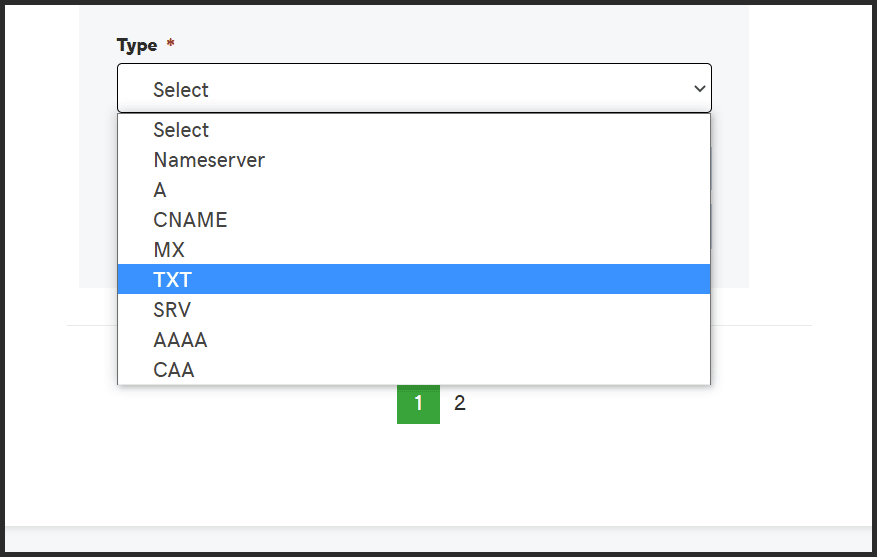
- Enter Host/Name:
- For the root or apex domain (e.g.,
domain.com), enter @ in the Host field. (Note: Some DNS providers may allow you to leave this field blank.) - If you are verifying a subdomain (e.g.,
mail.domain.com), enter only the subdomain name (e.g.,mail). Your provider often automatically appends the rest of the domain.
- For the root or apex domain (e.g.,
- Paste Value: Paste the verification text string provided by Google into the Value field.
- TTL Setting: Keep the Time To Live (TTL) field at its default value.
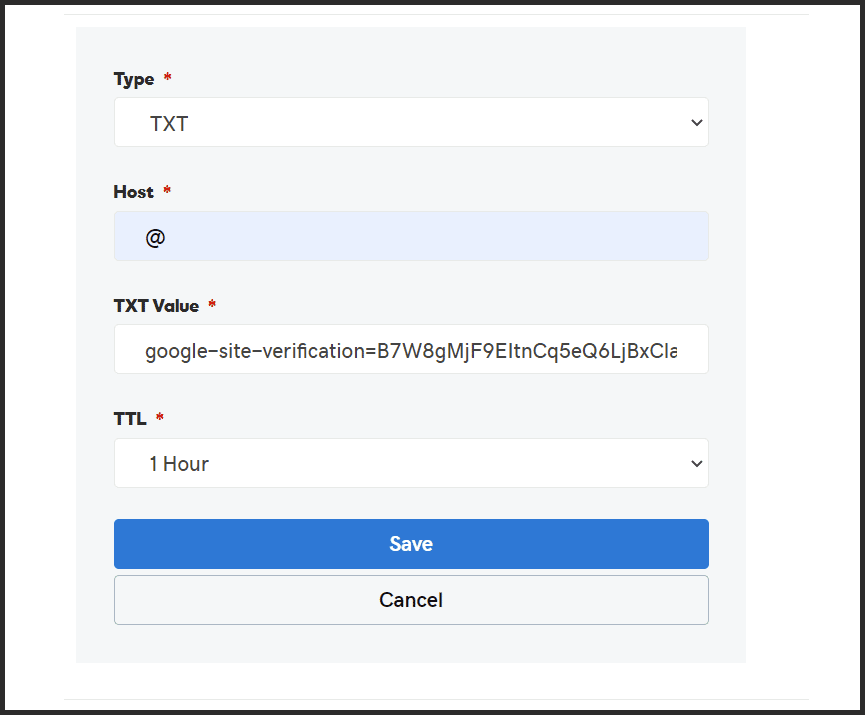
- Save Changes: Click the save button (e.g., “Save” or “Create”) to finalize the record.
- Verify Domain: Return to the Google Manage Domains page and click “Verify domain.”
- Note: Successful verification may require waiting for DNS propagation (up to 24 hours).
Couldn’t verify domains in Google Postmaster Tools?
Verifying Domain Ownership with CNAME Records
To verify your domain ownership for Google Postmaster, add the required CNAME records to your DNS zone instead of TXT records.
Action Steps:
- Copy the CNAME record details provided.
- Send these details to your IT team or add them to your DNS yourself following a similar process to the above example.
- Note for DIY: Ensure you are adding a CNAME record, not a TXT record.
- After the CNAME records are added to your DNS, return to the Postmaster page to complete the verification process.
Adding a User (Granting Access)
- In Google Postmaster Tools, open the Select a domain drop-down menu and select Manage domains.
- Find your verified domain in the list, click the three vertical dots (More options) next to it, and select Manage users.
- Direct Link Alternative: If the Manage users option is not available or not working, navigate directly to: https://postmaster.google.com/v2/u/0/manage_users?domain=yourdomain.com (replace yourdomain.com with your actual domain name).
- Select New user.
- Enter the user’s Google email address (deliverability@emailindustries.com) and click Add.
You’ve set up Google Postmaster Tools, now what?
For new domains, Google Postmaster Tools data may not be immediately visible. Data will begin to populate once Postmaster has collected sufficient information. Once the data is available, here is an overview of the information provided:
Compliance Status Dashboard
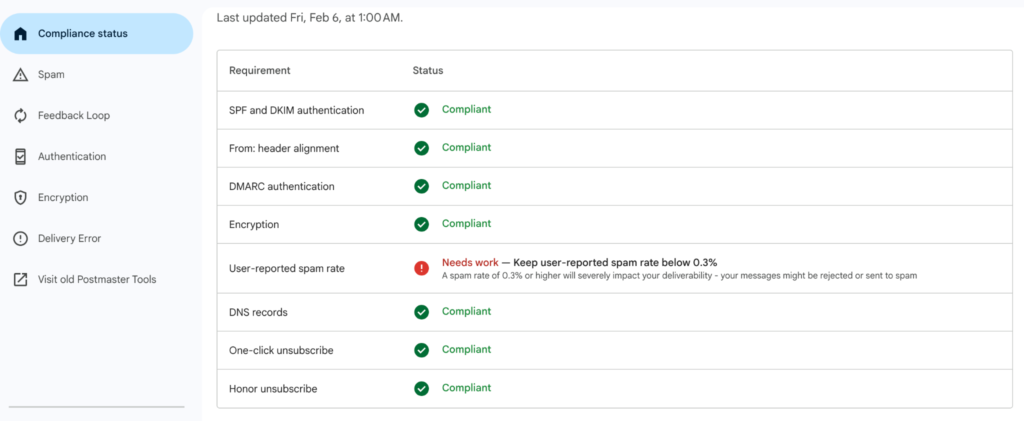
- Google’s Postmaster Tools V2 shows your overall compliance with Google’s sender requirements, including authentication, alignment, encryption, spam rates, and the required one-click and honor unsubscribe features.
- If your compliance is lacking in any area, Google will flag it with a “Needs work” status, along with basic details explaining the non-compliance. For a deeper investigation into these issues, use the additional options available on the left-hand panel.
- For more information about these specific requirements, please refer to: https://support.google.com/a/answer/14289100?sjid=2887233873783229887
Spam Rate Dashboard
The spam rate is calculated as the percentage of your messages that are delivered to the inboxes of engaged recipients and subsequently reported as spam by those users. Notably, messages initially placed in the spam folder but later marked as “not spam” are counted as successful inbox deliveries. Postmaster Tools provides this spam rate specifically for messages sent to Gmail users that have been DKIM-authenticated.
Feedback Loop Dashboard
The Feedback Loop dashboard provides insight into the spam rate of your email campaign messages, specifically those that include a Feedback-ID. This system is designed to notify you when recipients report your campaign messages as spam. The Feedback Loop ID acts as a unique link between each message and its corresponding email campaign. It is important to know that Google will only share details related to the Feedback Loop ID and will not disclose the individual email addresses of users who marked the message as spam.
Authentication Dashboard
The Authentication dashboard provides insights into the percentage of your emails that successfully pass SPF, DKIM, and DMARC authentication. Specifically, it reports on messages using your sending domain in the “From:” header. Google Postmaster typically indicates that, when properly configured, senders should aim for DKIM and DMARC success rates of 95% or higher.
It is important to note that SPF success rates are often observed to be lower, which is commonly attributed to messages sent via third-party services.
The Authentication dashboard offers additional viewing options:
- View by From header domain: This displays data for messages where your sending domain is present in the “From:” header. This view is crucial for highlighting whether your emails are authenticated in alignment with your sending domain, a requirement for DMARC compliance.
- View by DKIM and SPF domains: This displays data for messages where your sending domain matches either the DKIM or the SPF domain.
Measuring Success Rates:
- DKIM success rate: This is the percentage of messages where the DKIM domain aligns with your sending domain and the message passes DKIM authentication.
- SPF success rate: This is the percentage of messages where the SPF domain aligns with your sending domain and the message passes SPF authentication.
Encryption Dashboard
The Encryption dashboard displays the percentage of your authenticated emails that utilize an encrypted connection for transmission.
Delivery Error Dashboard
The Delivery Errors dashboard displays the proportion of authenticated messages (those using SPF or DKIM) that were either rejected or temporarily failed, calculated against the total volume of authenticated messages.
Need Expert Help with Your Deliverability?
For more than two decades, our deliverability experts have been helping senders and vendors hit the inbox—and increase market share. Contact us.